Pika AI is an artificial intelligence content creation platform that lets users create and edit videos from text, images and reference content. Pika offers a range of tools for the creative process, from generating short videos and turning photos into motion to editing and extending footage. For businesses and content creators, the tool can help build concepts, produce social videos and advertising visuals, and test ideas faster. In this article, TOT walks you through how to use Pika AI, breaks down its standout features and costs, and shares tips for creating natural-looking videos suited to each use case.
>>> See more:
- What is Kling AI? A guide to creating videos and images from text for free
- TOP 18 architecture AI tools for architects
- TOP 15 free AI meeting note-taking tools
What is Pika AI?
Pika AI is an artificial intelligence video creation and editing platform that lets users turn text, images and reference content into video. Pika currently positions itself as a video generation platform and app for social-first content, with features such as text-to-video, image-to-video, Pikaffects, Pikascenes and many other video editing tools.
Pika version 2.5 currently supports video generation at various resolutions depending on the plan and the features used. At its core, Pika belongs to the generative AI category, that is, technology capable of creating new content based on a prompt or input data.
Pika doesn’t just generate video from a single command; it also provides tools for users to control and transform visual content. For example, image-to-video turns a still image into a moving scene, while Pikascenes, Pikaswaps and Pikadditions help build or change elements within a video according to the described idea. Pika also develops its own video models.
According to official information, the Pika team has developed technology to train its own video models rather than simply providing an interface to a third-party model. However, Pika does not fully disclose the technical architecture behind each model, so you should not attribute a specific architecture to the platform without an official source.
Thanks to its ability to create and transform content from a prompt, Pika AI suits a wide range of creative needs, such as building social videos, testing advertising concepts, creating campaign visuals, turning product images into video or developing storyboards. That said, AI video can still show errors in motion, faces, hands, objects or consistency between frames. For this reason, Pika should be seen as a tool that supports the creative and content production process, rather than a default replacement for the entire professional post-production workflow.
>>> Learn more:
- What is image recognition AI? Common algorithms and popular applications
- Top 20+ best free AI image design software
What are Pika AI’s standout features?
Pika AI offers many features for creating and editing video with AI, suited to different creative needs. Some of the standout features include:
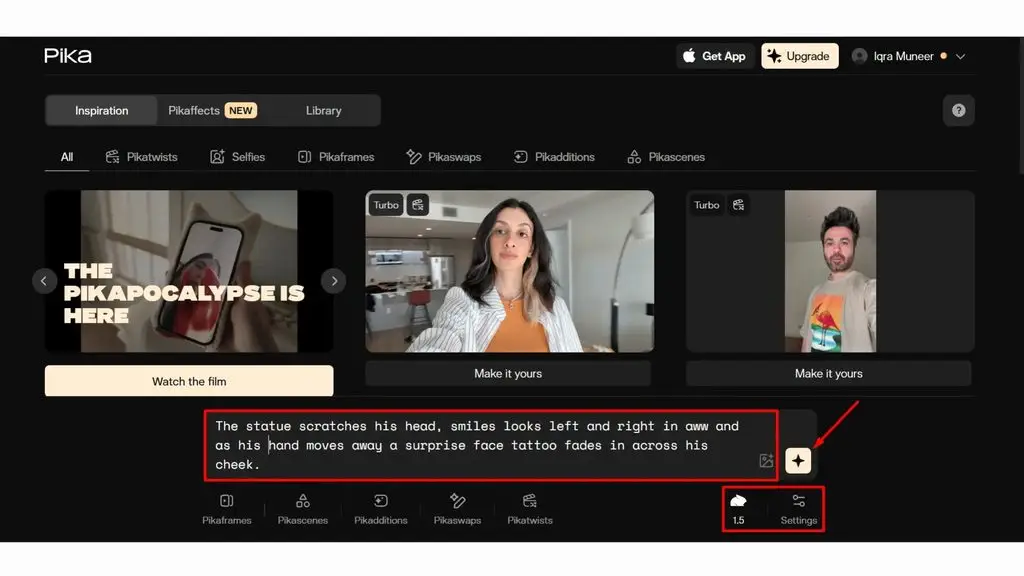
Creating Video from Text (Text-to-Video)
Text-to-video lets users create a video from a text prompt. The user describes the subject, action, setting, visual style and camera movement, and then Pika generates a video based on the described content.
For example, a user might enter: “A futuristic electric car driving through a neon city at night, cinematic shot, rain reflections, slow tracking shot”. Pika will generate a video scene featuring the electric car, the futuristic city, neon lighting, reflective road surface and camera movement as described.
This feature is useful when users don’t yet have real footage, need to test a concept quickly or want to create several visual options before producing the final video.
>>> See more:
- How to create video with AI: Top 15 free AI video creation tools
- How to create AI apps with vibe coding easily on Google AI Studio
A
Creating Video from Images (Image-to-Video)
Image-to-video lets users turn a still image into a moving video. Users can upload a product photo, character, landscape or artwork, then describe the desired motion with a prompt. Pika creates the animation based on the input image rather than starting entirely from a text description.
This workflow is useful when a business already has product visuals or a creator already has artwork but wants to add motion for use in Reels, TikTok, Shorts or advertising.
Editing Video with AI (AI Video Editing)
Pika offers AI tools that let users change or add content within an existing video. This group of features is useful when users want to transform part of a scene without recreating the entire video from scratch.
Some of the actions you can perform include:
- Replacing objects in a video.
- Adding new objects to a scene.
- Transforming the content or style of a scene.
- Adjusting motion and visual elements in the video.
For example, a product video can be transformed to change the subject, add an object or switch to a different visual style such as cinematic, anime or claymation. However, for requirements that need precise frame-by-frame control or in-depth compositing, users should still combine Pika with professional post-production software.
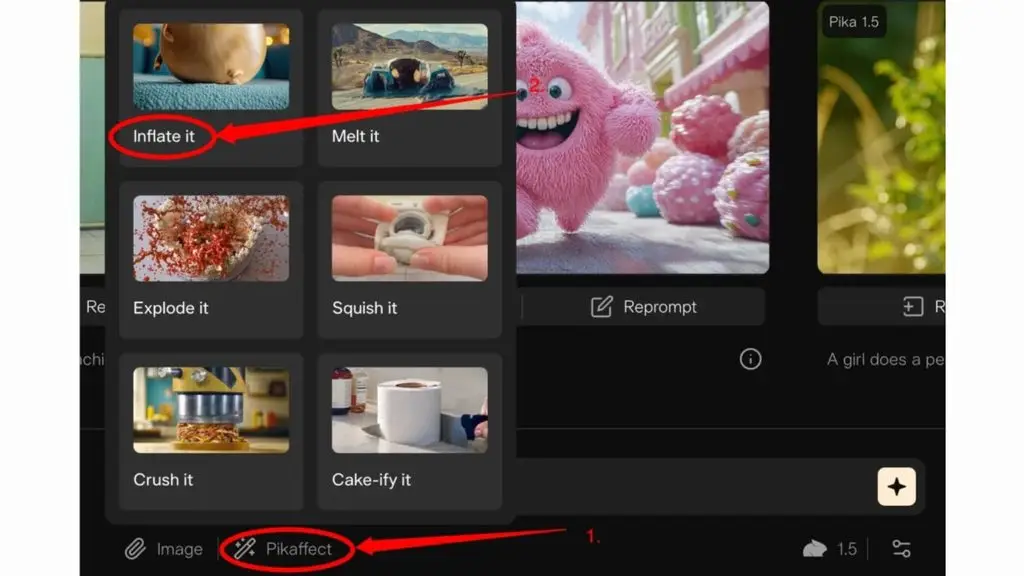
Creating Effects with Pikaffects
Pikaffects is a set of effects that transform an image or video according to special concepts. Instead of requiring users to write out an entire complex prompt themselves, Pikaffects provides ready-made effects to create a more visual “transformation” feel.
This feature suits social videos, entertainment content and concepts that need a quick visual highlight. For brand content, choose effects that fit the message rather than using effects purely to grab attention.
>>> See more:
- Image analysis with AI: How it works & real-world applications
- TOP 15 best AI code-writing tools
Creating Transitions with Pikaframes
Pikaframes lets you build a sequence of motion based on predefined frames or images. It’s a good option when users want to control multiple points throughout a transition rather than describing a single scene with one prompt.
Pikaframes is especially useful for storyboards, concept videos, transitions between images or content that needs a longer motion sequence than a typical generation.
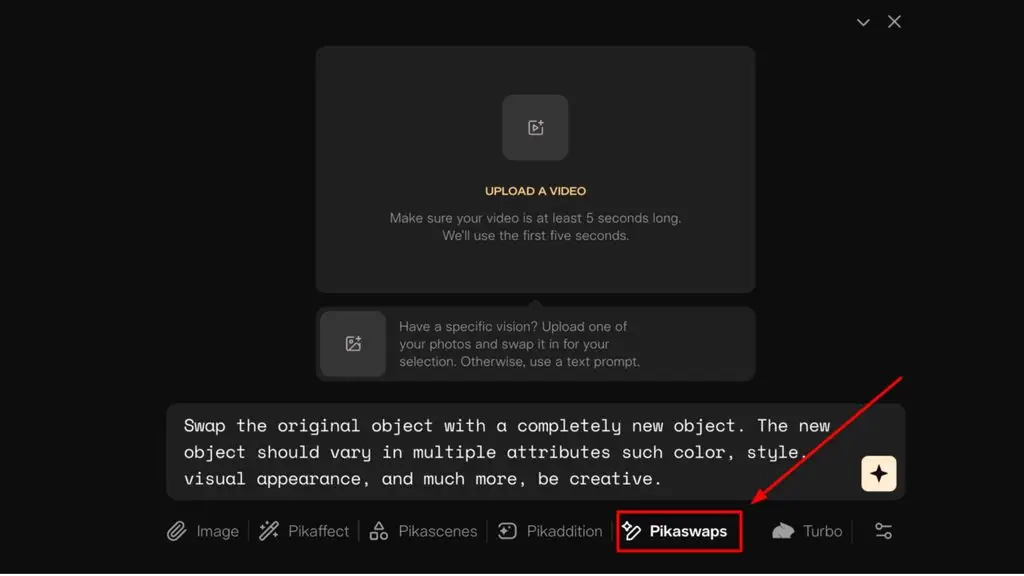
Pikaswaps and Pikadditions
Pikaswaps and Pikadditions focus on replacing or adding objects in a video. With Pikaswaps, users can change a subject or object in footage using a prompt and a reference image. Pikadditions, meanwhile, lets you add people, objects or new elements to an existing scene while still trying to preserve the setting and motion of the original video.
These two tools are well suited to testing concepts, creating ad variations or editing footage without reshooting the entire scene. For more natural results, the prompt should clearly describe the position, size, motion, lighting and relationship between the new object and the original scene.
>>> See also:
- AI in UI/UX design: The power of Generative AI
- What is Agentic AI? How it works & real-world applications
- 18 highly effective ways to apply AI to ecommerce
C
How does Pika AI video work?
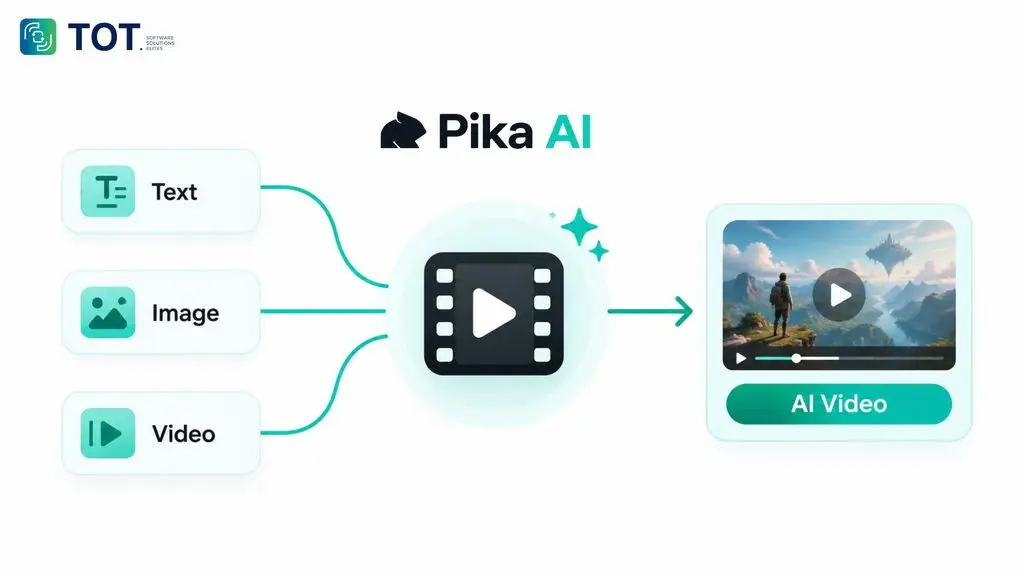
Pika AI turns an idea or input content into video through an AI generation process. Depending on the feature, users can start from text, an image or an existing video, then describe the desired result so the system can create or transform the content.
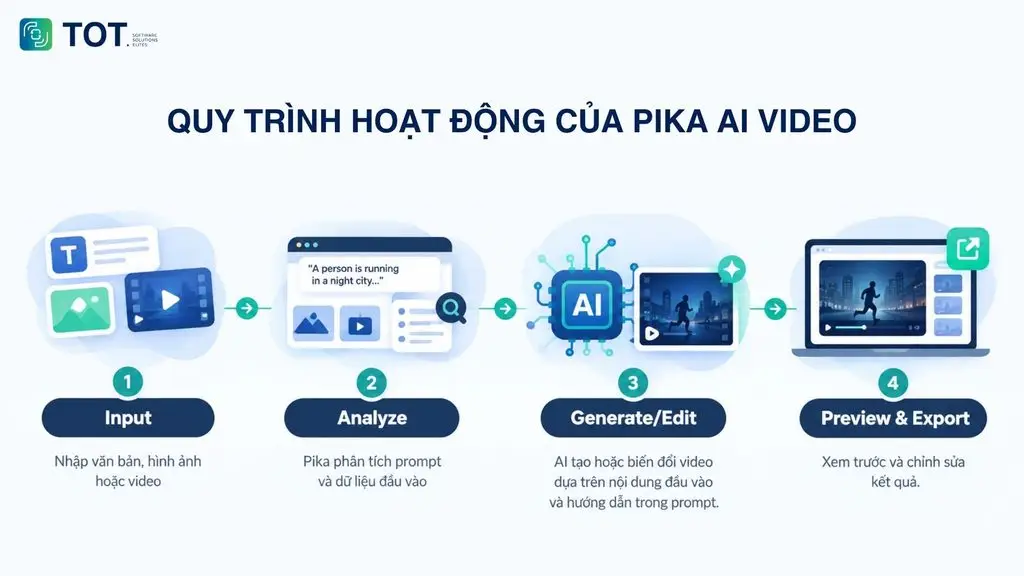
The Pika AI video workflow can be understood in four main steps:
Step 1: Enter text, an image or a video
First, the user provides input content that matches the workflow in use. With Text-to-Video, the input is a prompt describing the shot, subject, action and desired style. With Image-to-Video, the user uploads an image and can add a prompt to describe the motion. Some other tools let you use an existing video as the basis for transformation.
Step 2: Pika analyzes the prompt and input data
Pika uses the prompt together with the reference content to determine which elements should appear or change in the video. For instance, the prompt might describe a character running through a city at night, while the input image provides the initial appearance or composition. Clearly describing the subject, action and motion helps the AI better understand the idea you want to create.
Step 3: The AI creates or transforms the video
After processing the request, Pika’s video model produces a result based on the input content and the instructions in the prompt. With Text-to-Video, the system generates a video scene from the text description. With Image-to-Video or the editing tools, the AI uses existing content as a basis and then adds motion or makes the requested changes.
Step 4: Preview and edit the result
Once the video is generated, users can preview it to check the motion, subject, composition and details in the scene. If the result isn’t right, you can change the prompt, adjust the input content or generate another version. For videos that need multiple scenes, it’s best to break the idea into short shots and combine them in post-production for easier control over the result.
>>> See more:
- What is Predictive AI? Benefits and how predictive AI works
- A quick guide to creating a Landing Page with AI for free and effectively
- 29 standout AI website templates for SaaS, E-commerce and multiple industries
Pros and cons of Pika AI
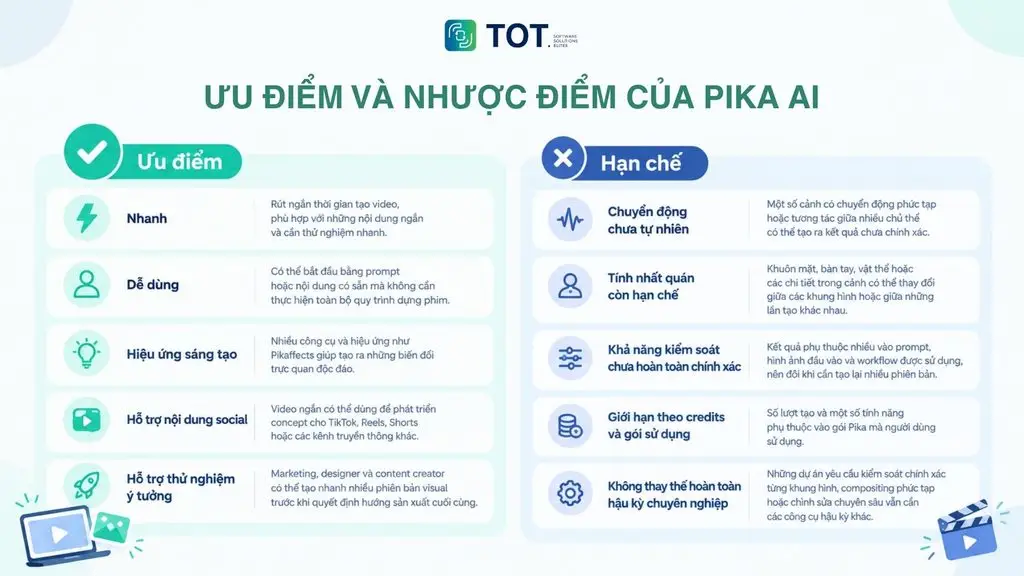
Pika AI helps shorten the process of turning ideas into video, especially for short content that needs quick testing. However, like other AI video tools, Pika still has limits in terms of control and the stability of its results. Understanding the pros and cons helps users choose a more suitable workflow.
Advantages of Pika AI
- Easy to get started: Users can begin creating video from a prompt or existing content without going through the entire manual video-production process.
- Fast video creation: Pika can turn ideas, images or footage into video in a short time, which suits testing many concepts.
- Multiple ways to create content: Users can choose Text-to-Video, Image-to-Video or the video transformation tools depending on their input content.
- Many creative effects: Features like Pikaffects create visual transformations that would otherwise require many post-production steps to do manually.
- Supports social content production: Short videos created in Pika can be used to develop concepts for TikTok, Reels, Shorts or other media content.
- Supports idea testing: Marketers, designers and content creators can quickly produce multiple visual versions before deciding on the final production direction.
Disadvantages of Pika AI
- Motion isn’t always natural: Some scenes with complex motion or interaction between multiple subjects can produce inaccurate results.
- Consistency is still limited: Faces, hands, objects or details in a scene can change between frames or between different generations.
- Control isn’t fully precise: Results depend heavily on the prompt, input image and workflow used, so you sometimes need to regenerate several versions.
- Limited by credits and plan: The number of generations and some features depend on the Pika plan the user has.
- Not a full replacement for professional post-production: Projects that require precise frame-by-frame control, complex compositing or in-depth editing still need other post-production tools.
>>> Learn more:
- Common workflows for AI Agents: How they work
- A guide on how to use Google AI Studio effectively and quickly
How to use Pika AI to create video
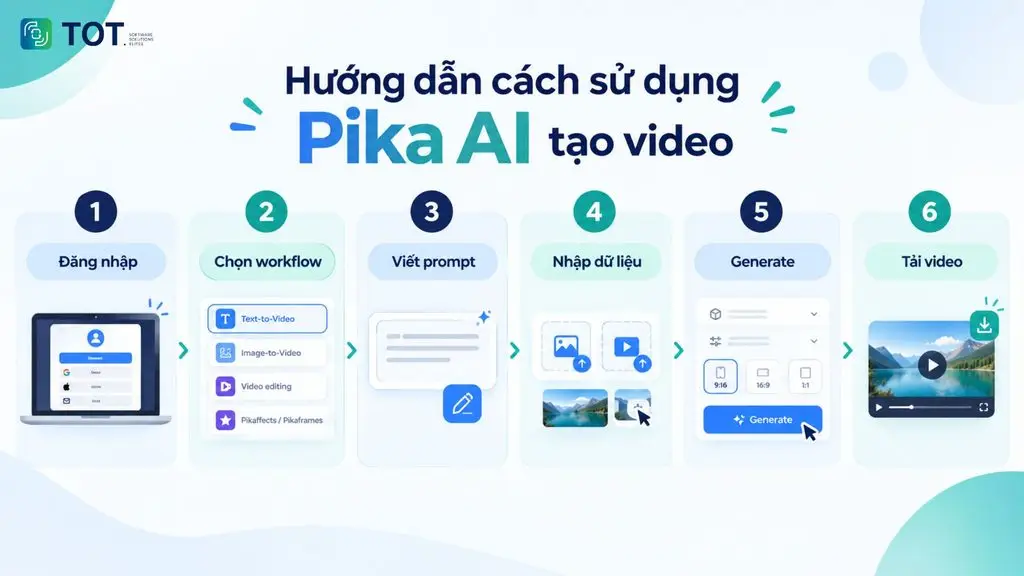
To create video with Pika AI, users need to prepare input content, choose a suitable workflow and clearly describe the desired result with a prompt. The process below focuses on the basic steps, from logging in to generating, reviewing and exporting the video.
Step 1: Sign up and log in to Pika AI
Users visit Pika’s official site at pika.art, then choose a login method supported by the platform at the time of use. The interface and login options may change with product updates, so users should check directly on the official website.
After logging in, users usually see an area for entering a prompt or choosing a video creation workflow. This is where you start tasks such as text-to-video, image-to-video, video editing or selecting ready-made effects.
Before creating your first video, it’s worth checking:
- How many credits your account has left.
- Which features your current plan supports.
- The output resolutions available.
- Whether downloaded videos have a watermark.
- The content usage policy and commercial limits if using it for business.
If a marketing team or business needs to create content regularly, it’s best to agree on a shared account, prompt standards and a file storage process from the outset.
Step 2: Choose how to create the video
Depending on the content you’ve prepared, you can choose a suitable workflow:
| Workflow | Input data | When to use it | Expected result |
| Text-to-Video | Text prompt | When you don’t yet have an image or footage | A new video based on the description |
| Image-to-Video | A still image | When you want to create motion from an existing image | A short animation based on the image |
| Video editing | An existing video | When you need to adjust objects, style or motion | A video transformed to your requirements |
| Pikaffects/Pikaframes | An image or video | When you want special effects or transitions | A video with creative effects |
Tip for choosing the right workflow: If you don’t yet have an image or footage, Text-to-Video is a good place to start. If you already have a product photo, character or artwork, Image-to-Video helps you make use of existing content and add motion.
Step 3: Write a prompt describing the video
The prompt is the description that helps Pika understand the shot you want to create. A good prompt doesn’t just describe a static image; it also describes the action, setting, lighting, style and camera.
A suggested formula:
[Subject] + [action] + [setting] + [camera angle] + [lighting] + [style] + [camera movement]
For example: A young entrepreneur presenting a holographic dashboard in a modern office, medium shot, soft daylight, clean corporate style, slow dolly in, realistic motion.
Or for a product video: A premium skincare bottle standing on a marble platform, water droplets gently moving, soft studio lighting, luxury commercial style, slow camera push-in.
An example prompt for a social video: A cute robot mascot dancing on a colorful desk, playful motion, bright background, close-up shot, smooth tracking camera, fun social media style.
It’s best to write prompts in English to make better use of how many AI video tools interpret prompts. That said, you can try prompts in Vietnamese and compare the results. The key point is that the prompt must be specific, avoiding vague descriptions like “make a nice video” or “create good motion”.
Step 4: Upload an image or enter input content
Depending on the chosen workflow, users will enter a prompt or upload reference content to Pika AI. How you prepare the input differs between Text-to-Video, Image-to-Video and the video editing tools.
- With Text-to-Video, users enter the prompt in the video creation field. The prompt should clearly state the shot, action, style and camera movement. If you need to exclude unwanted elements, you can add descriptions to avoid errors, depending on the Pika interface available at the time of use.
- With Image-to-Video, users upload the image first, then describe the part that should move. The image should be sharp, with a clear subject, few cluttered details and steady lighting. For portraits, avoid overly complex hands or accessories to reduce distortion errors.
- With video editing, users upload an existing video and then select an area or describe the desired change. For example, you can ask to replace an object, add an object, change the visual style or alter the motion. When editing a specific area, describe the object with a clear location such as “the red cup on the table” rather than “that object”.
Step 5: Configure the settings and generate the video
After entering your content, check the available options such as the model, aspect ratio, resolution or other generation-related settings. Depending on the workflow and account plan, Pika may offer different options for duration, quality and credit usage.
Some common aspect ratios include:
- 9:16: TikTok, Instagram Reels, YouTube Shorts.
- 16:9: YouTube, websites and presentation content.
- 1:1: Some social content or square-format ads.
Once the settings are complete, select Generate to have Pika start creating the video.
Step 6: Review, edit and export the video
Once generation is complete, review the video before downloading. Pay particular attention to:
- The motion of characters and objects.
- Faces, hands and small details.
- Logos, text or information on the product.
- The consistency of the subject across frames.
- Lighting, composition and camera movement.
If the result doesn’t meet your requirements, you can change the prompt, adjust the input image or generate another version. For videos with multiple scenes, it’s best to create each shot separately and then combine them in post-production for easier control.
Once finished, users can export the video using the options supported by their account and workflow. Limits on resolution, credits or watermarks may vary between Pika plans.
>>> See more:
- Build an online store with AI for free, SEO-friendly and highly effective
- TOP 10 free and paid website design AI tools that work
Is Pika AI free? Pika AI pricing 2026
Pika AI can be used for free, but the Free account has certain limits on credits, features and commercial usage rights. Users can upgrade to paid plans if they need more credits or want additional features and creator benefits.
Does Pika AI have a free version?
Pika currently offers a Free plan priced at $0, letting users start experiencing the AI tools without subscribing to a paid plan. According to the current pricing page, the Free plan has no recurring video credits and instead uses credit packs as needed; the account still has access to the models and can create videos without a watermark. However, this plan does not include a commercial license and has no priority queue.
If you create videos frequently or need to use the content for commercial purposes, you may want to consider the paid plans. Prices and benefits can change by billing cycle, so check Pika’s official pricing page before subscribing.
Pika AI pricing 2026
The table below summarizes Pika’s plans based on information from Pika Pricing. Prices and benefits may change over time, so you should check again on the Pika website before subscribing.
| Plan | Price/month | Credits/month | Key benefits |
| Free | $0 | 0, uses credit packs | Access to the models, no watermark |
| Starter | $8/month | 900 | All models, no watermark |
| Creator | $28/month | 3,150 | All models, no watermark, commercial license |
| Fancy | $76/month | 8,550+ | All models, no watermark, commercial license, priority queue |
Note: The prices above are the monthly equivalent when billed annually. Monthly billing may cost more depending on the plan. Pika also lets you buy additional credits when needed.
How are Pika AI credits calculated?
Pika uses credits to calculate the cost of each content generation. The number of credits needed depends on the model, tool, resolution and video length. For example, on the current pricing, Text-to-Video and Image-to-Video with Pika 2.5 have different credit rates for 5- or 10-second videos and 480p, 720p or 1080p resolution. Pikaframes can create longer segments, with the credit rate increasing with duration and resolution.
Credits in a subscription plan refresh each cycle and do not roll over to the next period. Users can buy additional credits if they need to keep creating content after using up their plan’s allowance.
>>> See also:
- Top 5 best code editors for computer vision
- AI Data Labeling: A guide to AI data labeling
- AI Agents for Startups: Benefits & real-world applications
Real-world applications of Pika AI
Pika AI suits needs that involve creating short videos, test visuals or developing creative concepts in a short time. The tool can support content creators, marketers and designers across many tasks, from producing social content to building visuals for advertising and storyboards.
Common applications include:
- Creating TikTok, Shorts and Reels videos: Produce short clips with a variety of visual styles and motion, ideal for testing multiple visual versions for social content.
- Product advertising videos: Turn product images into videos with motion, visual effects or creative settings for advertising and marketing.
- Social media videos: Create dynamic visuals for teasers, campaign posts, trend-based content or short video formats on social media.
- Storyboards and concept videos: Create visual drafts from ideas or existing images, helping creative teams visualize a concept before shooting or producing the finished video.
- Visuals for marketing campaigns: Create mood videos, dynamic key visuals or background scenes for landing pages, ads and marketing content.
- Creating motion from images: Turn illustrations, posters, artwork or character images into short videos with motion.
- Educational videos: Create short illustrative video clips for lessons, training materials or e-learning content.
- Testing film and game concepts: Create visuals, settings or motion scenes to quickly visualize ideas before entering the production stage.
For businesses, Pika should be used as part of a reviewed creative process. Output videos need to be checked for image quality, brand consistency, usage rights for input assets and communication requirements before publishing.
If a business wants to move beyond using AI tools to integrating AI, automating processes or developing digital products, you can explore TOT’s artificial intelligence software services to choose a suitable implementation path.
Tips for creating more beautiful and natural Pika AI videos
To create better Pika AI videos, users need to control the prompt, input quality, camera movement and scene complexity. Good results usually come from trying many variations, choosing the stable version and doing post-production when needed.
Write specific prompts
A specific prompt helps Pika understand the shot better. Users should describe the subject, action, setting, lighting, style and composition rather than entering a single short sentence.
A weaker example: “A woman in a city.”
A better example: “A young woman walking across a quiet Tokyo street at night, cinematic lighting, reflections on wet pavement, medium shot, slow tracking camera, realistic style.”
Describe motion, not just the image
Video needs motion, so the prompt must describe action. If you only describe the image, the result can look like a still image with a slight shake.
For example, instead of writing “a luxury watch on a table”, write “a luxury watch on a marble table, the camera slowly rotates around it, soft highlights moving across the metal surface”.
Define the camera movement
Camera movement makes a video more natural and cinematic. Users can use terms such as cinematic shot, close-up, dolly in, tracking shot or aerial shot.
Some suggestions:
- Close-up: A close view of a product, face or detail.
- Dolly in: The camera moves gradually toward the subject.
- Tracking shot: The camera follows the character’s movement.
- Aerial shot: A view from above.
- Cinematic shot: A filmic feel, usually suited to lighting and composition with rich depth.
Use high-quality input images
With Image-to-Video, the input image directly affects the video quality. The image should be sharp, well-lit, with the subject unobstructed and a composition that isn’t too cluttered.
If using a product photo, choose one with a clean background, little fine text and clear edges. If using a character image, avoid complex hand poses or small accessories, as the AI is prone to creating motion errors.
Create multiple versions and choose the best result
A single prompt can produce many different results. Users should generate several versions to pick the one with the fewest errors and the best look.
When comparing, evaluate against these criteria: how natural the motion is, the stability of the character, object errors, lighting, brand fit and how well it lends itself to post-production.
Break long videos into multiple shots
Long videos are usually harder to control than short ones. Users should break the idea into separate shots, each with one clear action.
For example, a product ad can be broken down into:
- An opening shot with the product on a clean background.
- A shot with the camera dollying in on the product detail.
- A shot of the product in a usage context.
- A closing shot with the logo or campaign message.
This approach helps Pika focus on each scene, reduces motion errors and produces videos that are easier to reassemble.
Conclusion
Pika AI is a notable tool for anyone who wants to create video from text, images or an existing video without starting with a complex shooting and editing process. The platform suits social content, short ads, storyboards, animation from images and testing creative ideas. Even so, users still need to check for motion errors, consistency and plan-based limits. The most effective approach is to write clear prompts, choose the right workflow, create multiple versions and do post-production when needed.
>>> See more:
- How to create an app with AI for free, in detail and simply
- How is AI in software development applied?
- How does AI programming assistance affect coding skills?
- Will AI replace web development? How to adapt effectively
Frequently asked questions
What is Pika AI?
Pika AI is an artificial intelligence video creation and editing platform. Users can enter a prompt, upload an image or use an existing video to create a new video, add effects, change objects or turn a still image into motion. Pika suits social media videos, short ads, storyboards, creative concepts and animation from images. The tool works best when the prompt is clear and the input is high quality.
Is Pika AI free?
Pika AI has a free version for users to try creating videos, but the limits on credits, features and download rights depend on Pika’s current policy. Some benefits, such as higher resolution, more generations or watermark-free downloads, are usually tied to a paid plan. Users should check the Pika Pricing page directly before subscribing, as prices and conditions can change.
Does Pika AI have a mobile app?
Pika AI can be used on a phone through Pika’s official platform. If you want to use the Pika AI app, check the pika.art website or the official app stores to confirm the right version. Avoid downloading the app from unverified sources to protect your account and personal data.
How long are the videos Pika AI creates?
The length of videos Pika AI creates depends on the model, workflow, settings and account plan at the time of use. Many AI video tools tend to suit short clips because motion and consistency are easier to control. If you need a long video, it’s best to break the content into short shots, create each segment separately, and then reassemble it with video editing software for a more stable result.